Fringe 101: 4 Different Ways to Cut Bangs
By: Kenra Professional
Our Kenra Professional stylists are constantly thinking of ways to keep their clients looking fresh and on-trend. Did you know that one of the top reasons why clients leave their stylist is simply because they are bored with their look?
Luckily, there are countless ways to refresh a style and make clients feel brand new. One way is by adding or updating the fringe/bang area. Small tweaks in the front of the face can create a huge transformation! Here are a few different bang styles and how to cut them!
1. Curtain Fringe
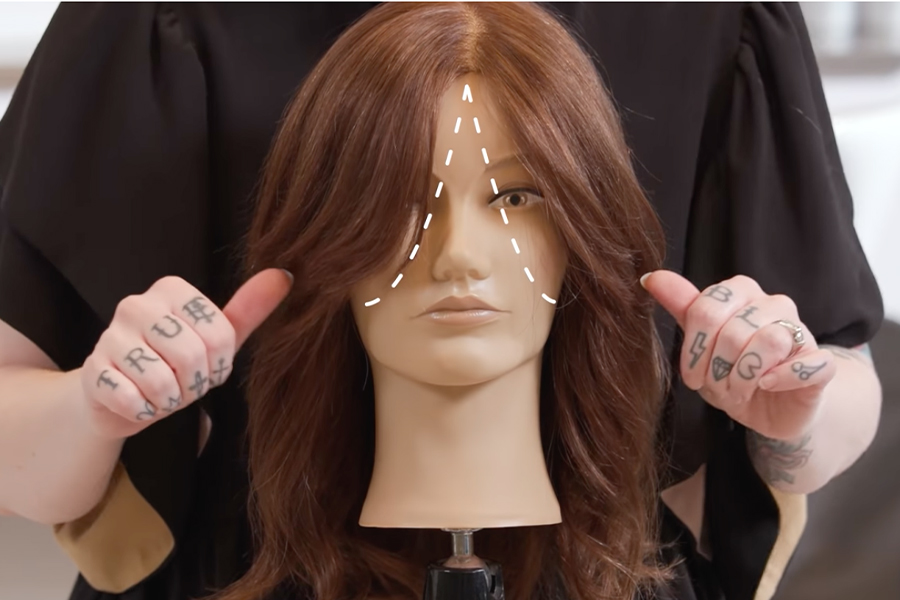
The classic curtain fringe has started popping up everywhere again, from Hollywood starlets to models to maybe even some of your friends! This fringe is standardly split down the middle with the sides getting longer as they feed into the hair. This is a great option for someone who might have a shorter face that wants to keep it relatively open and uncovered.
Working from the apex or the high part of the head, create a triangular section from that point to the recession, or to around the ends of each eyebrow. From that point, split the section in half to create the two different sides. Determine what length you’d like to cut the fringe—a good benchmark is usually around the bridge of the nose, but you can ultimately go with any length that suits your clients’ needs. Stand opposite the side you are working on and over-direct the hair toward the center, and then vertically slide cut the hair downward, which will give needed length to the sides as you release and slide the shears through. Repeat on the other side and ensure that both sides are evenly cut. When styling, use a round brush to bring the hair downward and then flip out away from the face. This will give that beautifully curtained effect!
2. Face-Framing Fringe
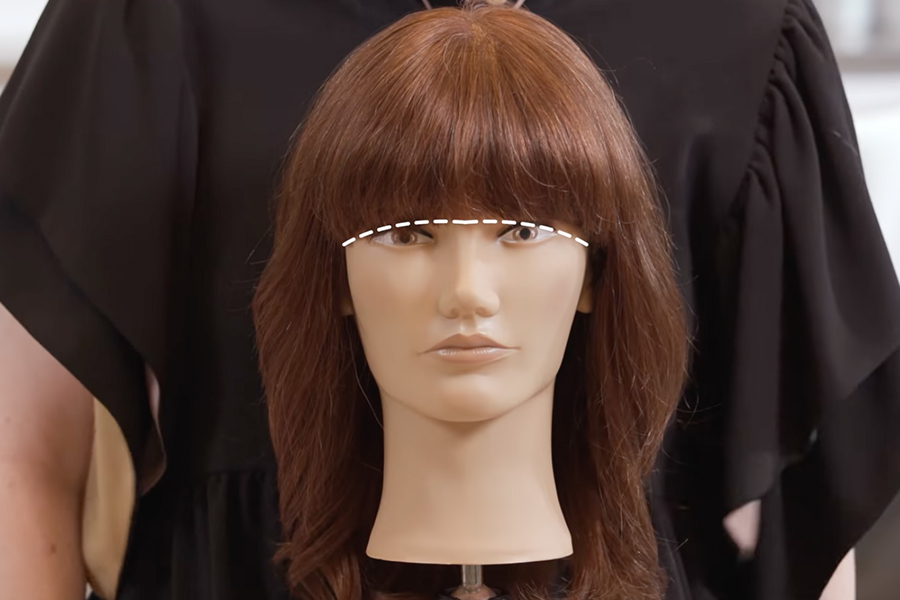
A softer approach to the full-frontal fringe, the face-framing approach allows for the hair to showcase the face while living just above the arch of the eyebrows. This look also provides a slight arch in the result, making it considerably softer than a blunt bang.
Using the same guide as mentioned in the curtain fringe, gather the hair inside your triangular sectioning and bring it all to the center. Doing this creates a natural over-direction on the sides which is what provides the natural arch. Determine the ideal length for your client, and then gently cut or point cut the fringe at that desired length. Point cutting will allow for even more softness in the overall look.
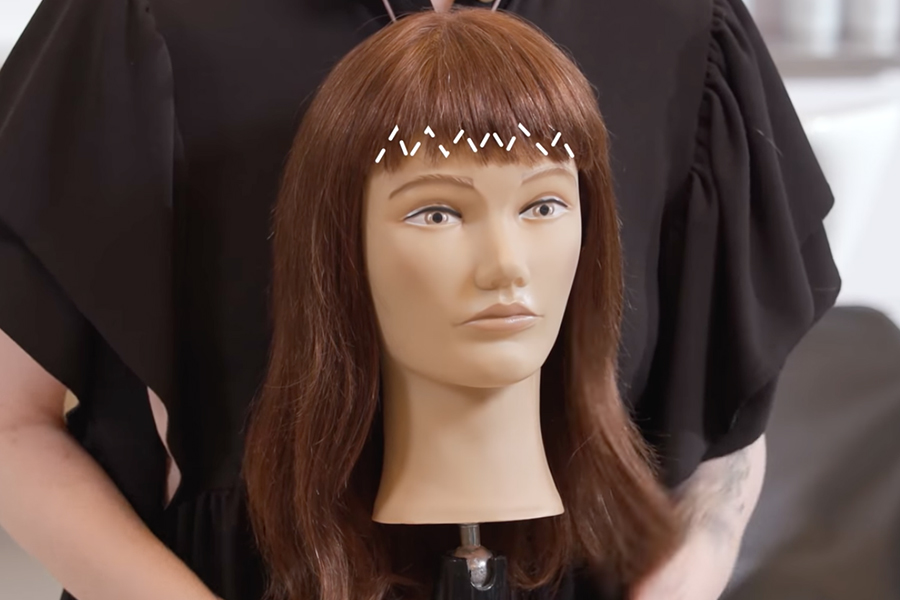
3. Squared Fringe
If your client wants to make a dramatic change in their look, perhaps the full-frontal or squared fringe is the way to go! This bold look requires nice clean sub-sections when cutting due to the importance of precision. It’s great for those with super thick hair to reduce weight as well as those with longer faces or larger foreheads to help equalize the overall shape.
Working in the same triangular guide above, take small horizontal subsections and cut a straight line across at the desired length. Try not to create any tension while cutting so that you get a better representation of where the hair will naturally fall, while avoiding any shrinkage or unwanted shortness. Continue working up the fringe using your previous cut as the guide.
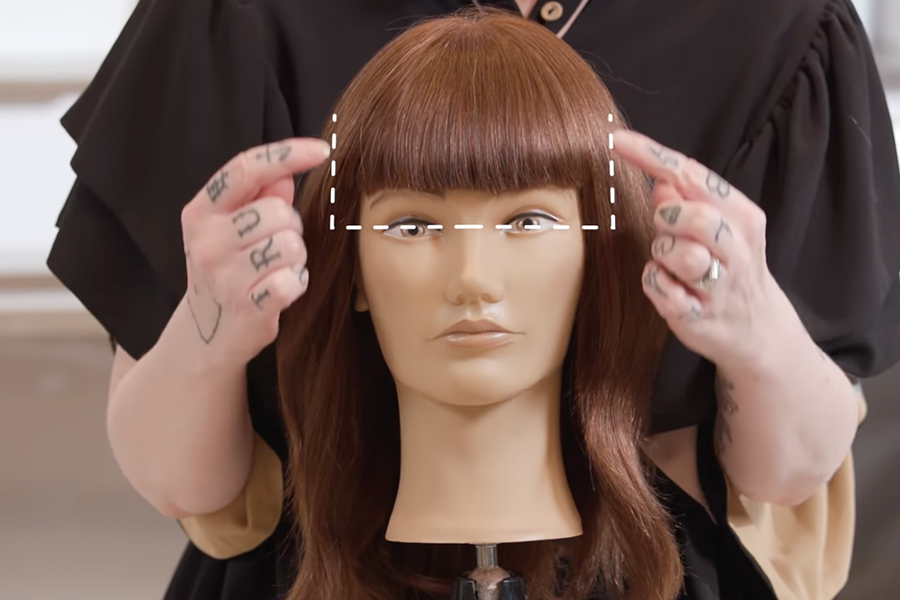
4. Piecey Fringe
Maybe the full-frontal squared approach is too stark for your client or their face shape, but they still want the overall concept? No problem! There are multiple ways to remove weight and bulk for a softer, piecey finish on this otherwise straight across bang.
Using the same universal guide, determine if you’d like to use a razor or scissors to achieve this look. If using a razor, work in horizontal subsections and weave the razor in and out of the subsection, then feather down, starting at least halfway down the fringe to avoid hair from becoming too short and jumping up. Continue the same process in horizontal subsections until the desired look is achieved.
Using scissors, you can create a similar effect by working in the same horizontal subsections and point cut to your liking, with variances in how deep you choose to point cut into the shape. The deeper the cut, the more piecey it will be.
Make your and your client’s bang vision come to life! Watch our fringe cutting tutorial below for more info!